Fiesta ST Update and Modification Plans

I recently took a (not necessarily wanted) few week break from posting, and as such, I figured it was time for an update on my personal car. As I have written about before, I recently leased a 2016 Fiesta ST, and I already have plans on buying it at the end. I have already written about a few of the modifications I have done to it, and even those that I had planned within the first few weeks, yet as I grow more accustomed to, and learn the feel of, the Fiesta ST, I can fine-tune my modifying desires.
But first, the modifications I have done over the past 6 weeks, since my symposer delete and my accelerator pedal. As soon as the sun showed its muscle for the first time, it became apparent that I had to tint the windows. I am going to write an op-ed on window tinting in general, so for now all I will share is what I had tinted. I tinted my legally-allowed rear windows to the maximum darkness, as well as tinting the front windows dark enough to protect my seats—and myself—from the Sun. Not only was this an effective modification, it made my car even more blaaackk.

After my window tinting, I decided to focus on making my Fiesta ST truly ‘mine’. As such, personal touches were required, and I focused my efforts on the interior. The stock ST shift knob is a nice-looking unit, however for my tastes it was much to shiny, and too odd a shape to be optimal. Shopping around, the Ford Racing carbon fiber unit really caught my eye. Purchasing on eBay lowered my costs a little, and the total cost was around $90, which, once the part was installed, was worth every penny.

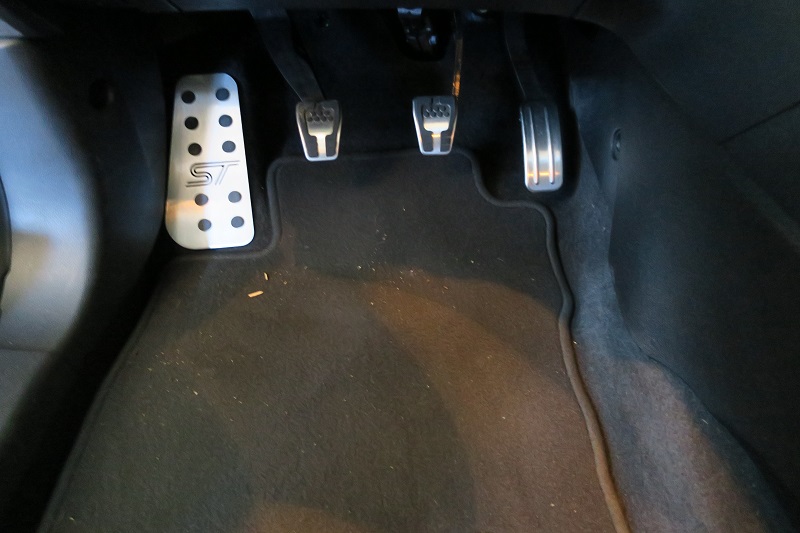
Around the same time, I decided to preserve my carpet, and add in a Boosted Designs dead pedal. While some dead pedals require drilling, shaving, or other scary means of modifying, Boosted Designs got it right, designing an aluminum dead pedal (with or without rubber grippers) which uses super-strength Velcro to adhere. Once installed—as simple as eyeing it and plopping it on—it looks so OEM that one has to wonder why Ford did not include something similar themselves. For $35, anyone who sees this for their Fiesta (or Focus, as it works for both) and does not get it, is simply insane
In more recent days, I have purchased a few other parts which are either about to be installed, or are going to be installed down the line once other parts are acquired. With the inside tastefully modified to set my Fiesta apart from a stock example, I wanted to do the same to the outside. To some, the Boomba wing risers I went with may not be exactly tasteful, yet they certainly set cars apart from stock examples.
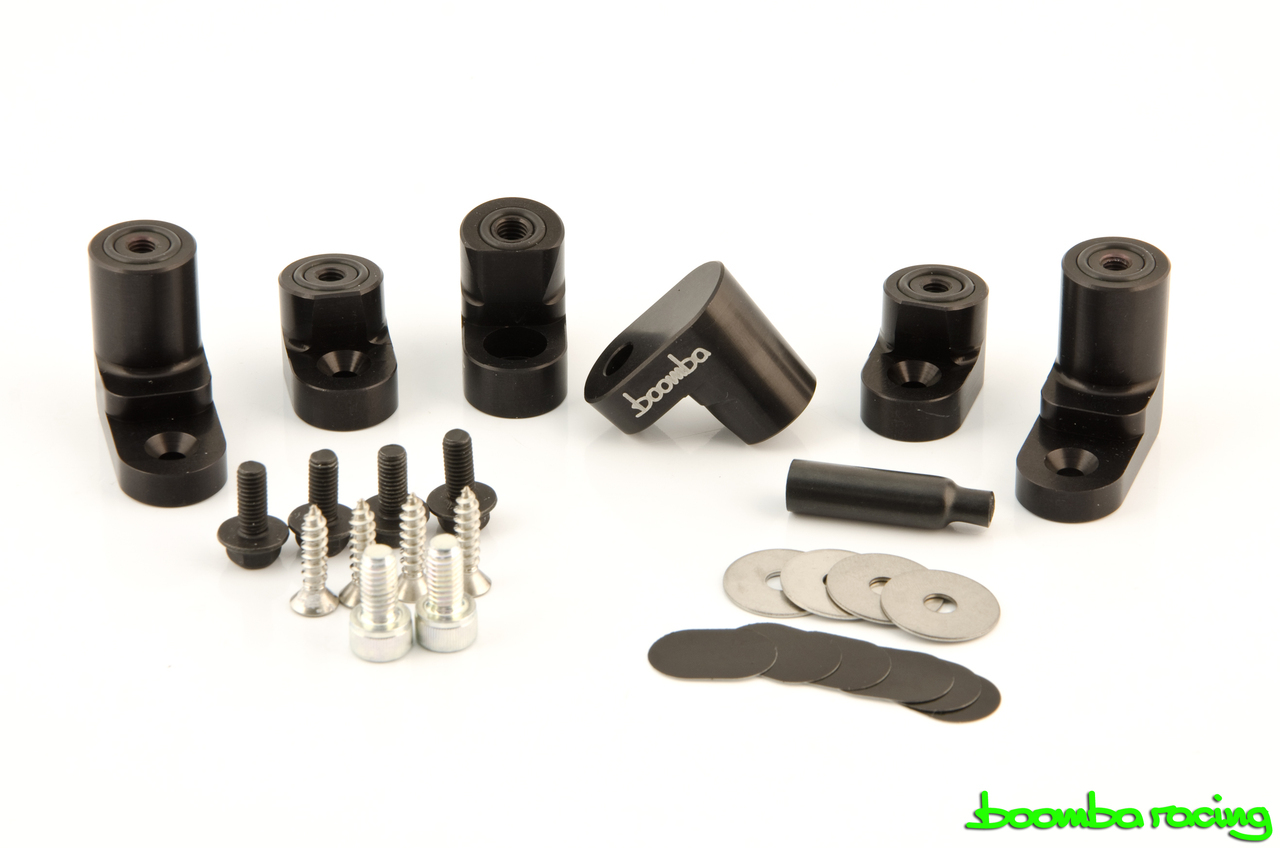
I always dig wing risers when I see them on other cars in the wild, and when I saw that Boomba offered black ones—to keep my stealth look—I decided to take the plunge and purchase them. With installation coming on Saturday, I will detail the process in a separate article.
I also purchased a fire extinguisher bracket from a gentleman on the forums named Caleb. The original post can be found here, and I decided to purchase it simply to have. As it uses the front seat mounting points, I am hopeful that it will be unobtrusive, and to help with that, I opted for the driver-side bracket. As I do not yet have a fire extinguisher, I will be waiting to install this, but will detail it and my impressions when I do.
Lastly, I have purchased Boosted Designs transmission bushings, which I have no plans to install any time soon. As the part was less than $30, I decided to pick this up while I remembered, and reserve them for installation until I address other parts in similar areas, simply to reduce my labor costs. These ‘other parts’ lead nicely into my planned modifications, with the following modifications listed in the anticipated order of install. The two parts which are going to be installed with the bushings are the Mountune rear motor mount, and the Mountune Quick Shift kit.
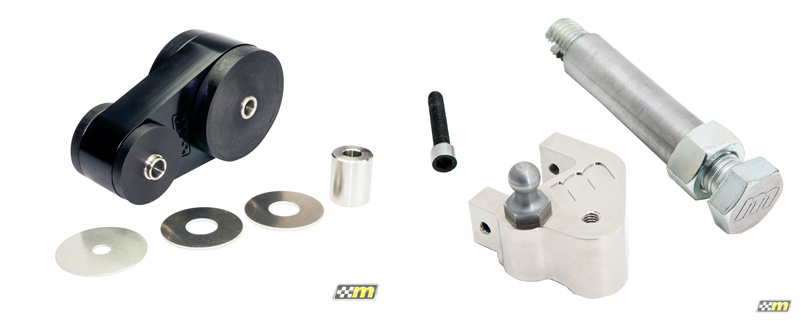
These parts combined would not only be replacing a lot of flimsy FoMoCo mounts and bushings, it would tighten the feel of the car, both through my hand and the shifter, and my entire body with the RMM.
After these modifications, I will have addressed the cars style, as well as its feel. I firmly believe that the stock chassis set-up can handle more power, so I feel comfortable upgrading to the Mountune MP215 package, which consists of a warranty-safe, smog-legal, tune and airbox. While pricey at $999, the very tangible benefits of the smog-legality and warranty protection are enough to win me over.
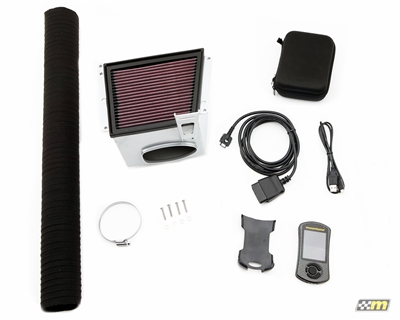
My hope is that this power increase to 215BHP and 236lb-ft will be enough to sate me until my warranties expire, and I can modify with more peace of mind. Coupled with this, I would like to purchase the Cobb AccessPort A-pillar mount, which works with the Mountune unit, allowing me some extra data logging capabilities.
At this point I figure some wear and tear items will need replacement, if not sooner. For tires, I plan on increasing width from a 205 section to a 215 section, which will increase grip slightly. The most important benefit of this switch is the wider availability of tires with a 215-section width. Brakes would be next on the list, with only moderate upgrades planned. Although puny looking, the balance of the stock brakes is surprisingly great, with enough stopping power from stock. As such, longevity and performance under heat are the goals when upgrading brakes, and Mountune appears to have addressed this with their RS-R brake upgrade kit. Consisting of pads and steel lines, the addition of a great brake fluid will complete the package.

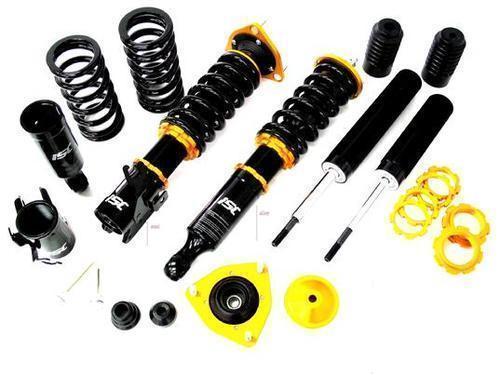
Next on the docket would be addressing the suspension. The Fiesta ST handles beautifully, with the suspension keeping grip around corners, while not being upset by bumps. That being said, living with the suspension leaves more to be desired; namely the suspension is too bouncy. As well as being bouncy, the Fiesta ST has a surprisingly large wheel gap, both problems ISC Suspensions seeks to solve with their complete coil over kits. While not ST specific, I am looking forward to trying out the fitment of their coil overs.
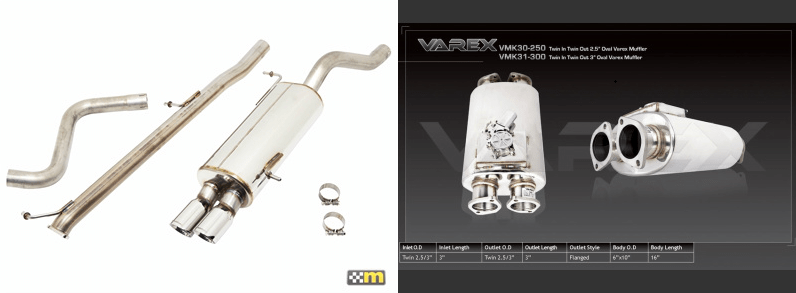
The last future upgrade I will detail today is the exhaust, perhaps one of the touchiest subjects in the modifying world. There are no doubts as to the benefits of a well-designed exhaust system, yet the fear many people have is the effect it will have on noise. Everyone wants a great sounding car, and to that end I have pieced together a system which I believe will fit my bill. Starting with a Mountune complete exhaust system, hung with the requisite Cobb hangers, I want to modify it with a Varex adjustable muffler, controlled by an aircraft style switch installed behind the shifter (in the useless cubby located there).
With the above modifications—sadly done over the years—I think my Fiesta ST would be my ideal car. Not detailed here are some uncertain or undeveloped modifications such as chassis bracing (which depends on the effects of the coil overs) and oiling system modifications. Not detailed are the “dream” modifications that I also have in my head, which sadly depend on too many variables in the future to be certain modifications (Hybrid Turbo anybody?). Want to read about these modifications or think I am doing something wrong? Let me know down below as well as liking the article and sharing it with your friends!

2 thoughts on “Fiesta ST Update and Modification Plans” Leave a comment ›