
Fiesta ST: Mountune Symposer Delete Install and Impressions

While most people baby their new car, protecting it from any and all damage, dirt, and any other imagined slights—at least for the first few months—I have taken a bit bolder course of actions with my new 2016 Fiesta ST. With less than 1500 miles on the clock, and nary a payment made, the modifications have begun. Using some good-spirited funds from Christmas, the first two modifications have made their way onto the ST. The first one purchased and installed was the Mountune Symposer Delete, and is the focus of this article today. The second modification was the Active Shift Designs accelerator spacer, and will be detailed in a later article.
What it is:

While a whole article could be written on the pros and cons of symposers and other means of producing engine noise in the cabin, as well as the technical aspects of each—hint hint—the simple fact is that some people like the Fiesta ST’s symposer, and others don’t like it. While I did not hate it, I would have preferred to naturally hear the engine, turbo, or even the lack-thereof if that is the case. The Fiesta ST’s symposer is mechanical in nature, requiring no electronics, which means that while the noise is not ‘fake’, a simple button press cannot disable it.
Luckily, Mountune—and other companies besides—have made a product that simply, and safely deletes the symposer on a permanent basis. While I suspected I would want one, driving the Fiesta ST for over 1000 miles confirmed that I would prefer no longer having a symposer. And as such, come Christmas day, I purchased the Mountune Symposer Delete Kit for about $50 all told after shipping and tax. I chose the Mountune kit due to their relationship with Ford, as well as the ability to tap into the provided bung for a controlled source of boost for use in a gauge.
How it Came:
Purchasing products from Mountune could not be simpler, and due to their Southern California location, shipping is always quick to me. Their packaging is also simple, simply a bag with more bags in it.

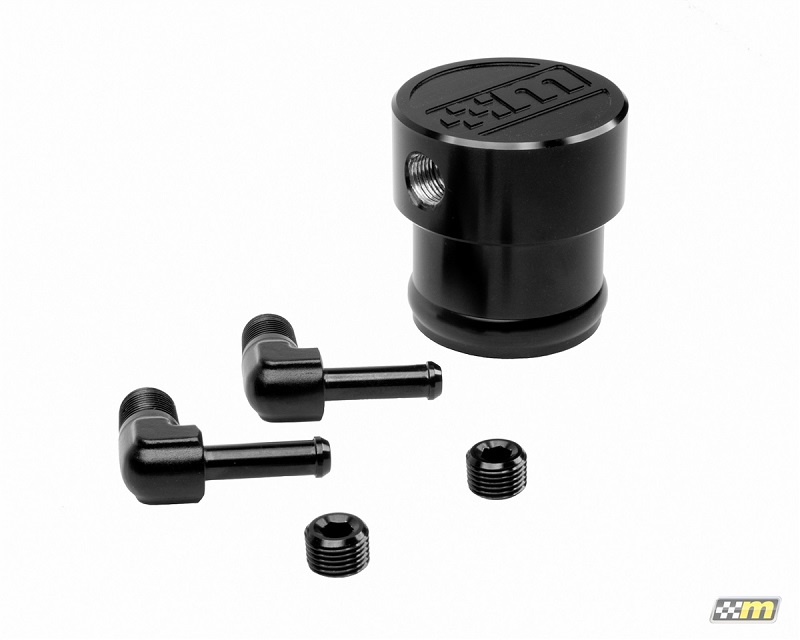
Once open, you will find the obligatory Mountune decal, a single page of instructions, printed front and back, as well as in color, the metal bung, and four bags containing either a screw to be used as a plug, or an adaptor to turn the symposer delete bung into a boost source for a gauge or something similar. Immediately the part looks very professional, and feels very solid, as do all of the fittings. While only offered in black—an oversight that might annoy some—the slightly drab color keeps the part looking stealth, and closer to an OEM look that I desire.

Installation:

The first step of any installation after unboxing is always to read the instructions. With this part, this is a very quick exercise. Installation is very simple, and almost anyone—from a young adult to my grandmother—could follow the instructions. Before even opening the hood, you must decide whether or not to use it as a boost source or not. For me, this was simple, as I did not, and so I chose the two ‘plug’ screws, and assembled the bung. After that I found a pair of needle nose plyers, and opened my hood. After disconnecting the right-hand hose from the symposer—which is located top, front, and center of the engine—I tucked the now slightly loose hose up and out of the way.

After that I could work on the bottom, and last, hose. These are where the plyers come into play, as Ford uses a type of hose clamp which needs to be pushed together to be released. This can be the challenging part of the installation, or at least it was for me. If you are lucky, the parts you need to clamp will be facing out, easy to access. If you are like me, then the two parts to force together with the plyers will be out of sight, under the symposer. If this is the case, while it is advised that you leave the symposer in its rubber bracket until fully disconnected, it may be required to remove it first to be able to move the hose to-and-fro to access the clamp. This is done by a steady, strong pull.

After the symposer is fully removed, it can be safely set aside, for potential re-installation at a later date. If you have a little grease on hand, it is easiest to grease the already-assembled bung, and simply pop it firmly into the bottom hose that fed into the symposer. After that, it is a simple matter of re-using that annoying clamp of Ford’s, although doing so allows you to place the clamp in the direction you want. While not required, I used a zip-tie I had on hand to secure the top, slightly loose hose, so it would remain secure. At this point, Mountune’s symposer delete kit has been fully installed!
Finished Result:

This is a modification where the results are clearly advertised: the growl from the symposer will be deleted from the cabin. Whether or not you will actually like the part is entirely subjective. For me, immediately upon driving the car the engine sounded muted. While I expected less sound, I was worried the effect was too drastic with a stock exhaust. After putting a few miles on the car, the lack of sound stopped leaving me with the impression of a muted engine, and was replaced with an impression of refinement. While getting on the gas no longer provides a deep-resonating growl from the symposer, you can now hear the turbo whooshing in air, with a little ‘chirp’ from the wastegate. This provides plenty of aural excitement when driving enthusiastically, and when just puttering around town or driving with the family, the car sounds quiet and civilized. This diminishes the constant ‘boy racer’ feel of the car, at least with no other modifications, which to me was desirable. Now, rather than being in ‘ST’ mode all the time, I can pick and choose when to get that ‘boy racer’ feel the Fiesta promises.
Liked the article? Like it and share it with your friends! Disliked it? Tell me about it down below!

Good article mate. I notice there is only one “plug” in the symposer kit – are there not other pipes/cavities which need plugging to prevent water/dust etc getting in?
Cheers
LikeLike
There is a plastic hose that connects to the firewall (if you look under the stop/start button you can see its exit into the interior). The sole purpose of this hose is to transport the noise from the symposer to the cabin. Some people plug it with a towel and zip tie it, while I simply pointed it ‘down’–so water and air has a harder time entering it–and zip tied it in place. I would rather have a few atoms of stuff get into the hose, than have a towel I would immediately forget about spend however many years in my engine bay.
LikeLike
Great article, thank you for the advice. Was unsure whether to do or not (partner hates the noise), but i think i’ll give this a go now.
LikeLike